Manual
Table of Contents:
Setup and Tabs
(The terrain system was just revamped to be way way better than what you see here. Stay tuned)
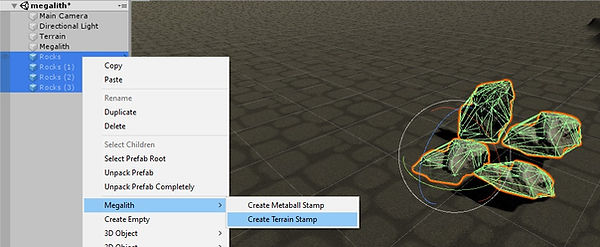
Creating a Terrain Stamp:
Select a Stamp, and an Action:
(You can select multiple actions using Ctrl. The order in which they're selected does matter.)
You can also select multiple stamps; each with a different action! You can get very creative!
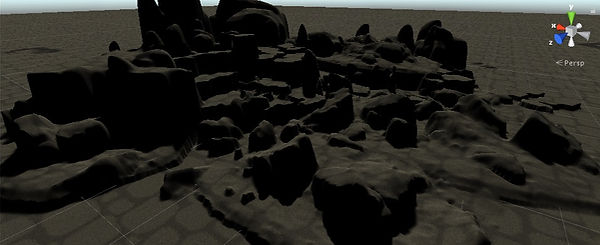
Click to Stamp on the Scene:
(those rocks created a terrain stamp, which created that terrain!)
In just a few minutes using only two terrain stamps we've achieved a lot of detail:
(Click on the terrain, go to it's settings, and play with the "Heightmap Resolution".
My terrain is set at 4097. Be careful to not scale up your stamp much at this high resolution to avoid performance drop.)
Terrain Stamping:
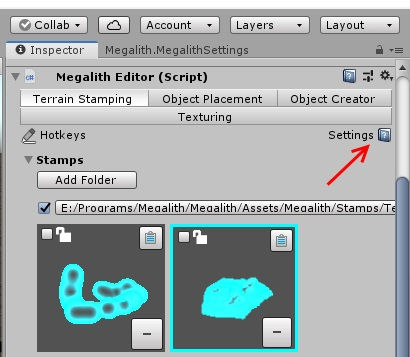
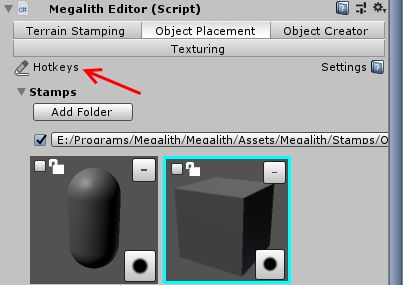
Create a terrain, and Setup Megalith as shown to the right:
Hold Ctrl to select multiple tabs so you can use them at the same time!
Notice the Hotkeys, and Settings on the pic to the right:
It's a quick link to them. Make sure to look at the hotkeys. There's an awesome hotkey manager so you can control what your hotkeys are! (though I'm partial to like the defaults)


Extras:
Use Ctrl to select multiple stamp actions in the order you want them to be performed.
The first action "Emboss" already does an add, and a smooth action. Sometimes, it's nice to do a Flatten, Add action. Smoothing it good for getting rid of steeply stretched cliffs, but if you make tiers down the cliff it can look good to have that stretched tight cliff look. Smoothing is not good in general though because it removes detail.
Use the Flatten action starting at the top of a peak. See what happens.
Adjust the Distance Increment so that as the left mouse is down, it'll create the desired effect.
The other settings on this tab are self explanatory. Refer to Tool Tips by stopping your mouse over any setting if you have any questions, or feel free to contact us. Thank you.
The Grid:
Using the Grid is a very powerful tool that's used in every tab within Megalith.
Let me show you!
Change it's color and transparency!
Cool, but read on!
Ok, Press G, press G, press G
ohhh!
Now try using it with terrain
stamping.
Press K, press K, press K
ahhh!
This is very useful for creating slopes.
(Tip: start with a low res height map to get an idea of the shape of your landscape, and then add the detail)
Press J, rotate your scene with the right mouse, press J again.
I mostly use this for Object Placement, and Obj Creation.


Extras:
Holding H allows you to move the grid.
This allows you to quick move the grid and use the same angle elsewhere.
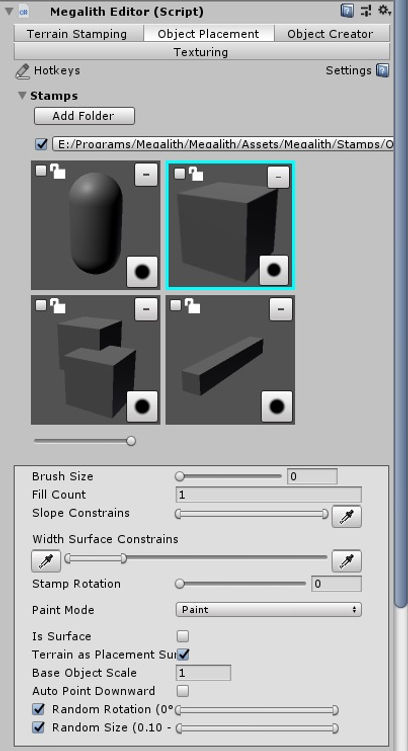
Object Placement:
It's easy to use, but has depth to do very powerful things.
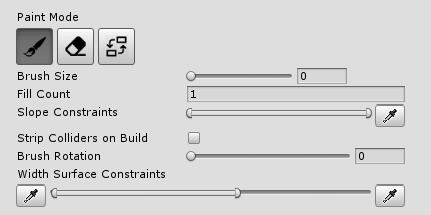
Brush Size 0 = Single Object Mode
Brush size 1 or more, you're in Brush Mode.
(it automatically increases fill count, and the distance increment so that it feels good to just brush a bunch of objects)
Fine tune them later.
Slope Constraints:
Use the eye dropper. Click for the minimum slope, click again for the maximum slope. It does the hard work for you!
Width Surface Constraints:
To place in between small rocks that are on something bigger, you'd only want to place on something big, and not anything small.
Use the left eyedropper just the same way as before with two clicks to set the minimum width an object must be to be placed upon. (in our case we'd set the minimum width to be larger than anything we don't want to place on.)
Use the right eyedropper the same to set the maximum width an object must be to be placed upon.
(and we'd set the max width to be bigger than everything we want to place on.
Is Surface?
A tree is not a surface.
A building block is.
Try the setting with a cube (brush size 0).
So if you don't want trees placing on top of trees, make sure the tree isn't a surface.
Terrain is Surface? Yes, you almost always want the ability to place on the terrain.
However, if you want to brush on a single rock, and not on the terrain, you may want to turn it off temporarily.
Hot Keys:
There's two ways to open the Hotkey Manager.

Let me point out a few starting at the bottom of my keyboard working my way up.
, and . (< >) rotates the object
; and ' for distance increment (the grid)
(while you hold down the mouse, it places or stamps using that increment spacing.
[ and ] scales things bigger and smaller
- and = (- +) decreases or increases the elevation of things.
9 and 0 are for brush size
These work across all tabs as they're global hotkeys.
Adjust the defaults in the Megalith Settings.

Back to Object Placement:
Base Object Scale:
This controls the scale of the object being placed.
Random Size:
This uses the base object scale, and fluctuates it from .1 to 10 relative to the base scale.
Auto Point Downward:
This is powerful! The preview object will align to any slope and point downward. So if you have 4 walls, you can place a light that'll automatically orient itself to each wall and face straight downward. (use the grid to keep the same elevation)
Random Rotation:
You can figure it out. :)

Modes for Object Placement:
Paint Mode:
Used for placing objects
Erase Mode:
Yes
Swap Mode:
This is noteworthy! You can have a scene of placeholder objects and swap them out for the new and improved objects at the click of a button.
Currently hold M and click to swap out all of whatever object your mouse is hovering over in the scene.to whatever object you have selected.
You can also use the brush to selectively swap out objects. (Make sure the width surface constraints is set to only effect the desired objects.)
Again, use the left eyedropper to set the minimum size. (It should be smaller than your object, while the right constraint should be bigger than your object) (this may get updated to only use one eyedropper to click on an object to set both constraints in the future. Let me know what you think.)
If you right click on any stamp, or object, or texture, ect in the inspector you can get find the asset in your project folders!
In the object tab, you can also copy all the settings of an object, and then paste it to one or multiple objects. It's a pretty awesome little feature.
Strip Colliders on Build:
This works in play testing as well as for a build.
Currently it affects all of any object. You'd have to have two of the same platform object if you wanted one to be a platform that you can fall through (a trap door), and another as a solid platform that you can jump on.
You can't turn it on and off while placing the same object type for all of that type will have whatever the setting is set to, even objects that are already placed.
Object Sculpting:
You can left click and drag the material spheres around to look at them. Kinda cool right?
What's it for:
This was an experiment that I decided to include. And it works pretty well! You can create quick fully textured objects, and even create metaball stamps to build with the shapes you make. It has it's own smooth style! You can't make sharp detail with spheres. And there is a limitation to the number of spheres you can use before performance starts to drop. (it's not for making a whole terrain out of, it's for making big land objects. Like if you want to create a base mesh like a land bridge that's scaled perfectly with your level, you can use this to achieve a quick result that you can further develop into a detailed object using a third party modeling software.
Maybe you'll create a land bridge with this tool, and then place low poly rock objects all over it, and then delete the form, or use its form as a collider instead of all of the rocks. Or maybe you'll create your whole game out of metaballs so it has it's own unique style.
How to use it:
The selected stamp is defaulted to a sphere.
Select a material.
Click somewhere on the terrain.
Brush Size:
If it's 0, you'll have a single sphere to place, and when you scale using the hotkeys [ ] you'll have just a single sphere.
If you have a brush size of 1 or 2, you might see more spheres to place. If you keep lowering the scale while at brush size 2, you'll start to get a ton of spheres. There's a hard limit to the number your brush can have to stop you from crashing unity.
Quality:
This is the main setting you should know about. It controls the verts and tris of your mesh. You can keep track of these as soon as you place your first node. You can change quality of your mesh at any time.
How it works:
It literally creates a mesh every time you click, or release the mouse. It's good that you always get a textured mesh from it, but the more verts you have, the longer it'll take to create the mesh with each click.
Metaballs are created from rays being cast from the inside outward to render it. So it's actually not possible to use one group of nodes to create a ball with a space inside it. It'll have a black zone inside where it can't render. So to create caves, you'd need two seed meshes going at the same time.
Locking with multiple creations:
You can have multiple creations going at the same time however. Hover your mouse over your metaball object, and press L to lock it. Your next click will use the same material for a second creation. Pressing L on your first creation will lock all others and unlock the one you pressed L over. This is useful because you don't always want to merge all the nodes together.
Caves?
Sometimes you want two separate meshes going at the same time. This approach can be used to create a cave, one stamp to create the lower half of a cave, and another stamp to create the upper half. Theoretically, if the stamp pivots are correct, and if the grid is on to keep the elevation, you could use the quick spline, holding ( Y ), and you might be able to create a quick cave.
Convert to Terrain Stamp:
Probably the most useful thing you'll start with.
Create some geometry, it can be crazy! Make it into a terrain stamp, and then go to the terrain tab to use it!
Construct Mesh:
Once you do this, it's a mesh for life! So you may want to convert to metaball stamp before creating it as a mesh. This way the metaball stamp in a way save your progress. However, currently it's not perfect in keeping everything exactly as you created it to be. Just saying it's not fail proof.
Terrain Texturing:
Setup your textures:
Make sure all textures are the same size (512), and have read write enabled
Add them:
click on the gears and add textures.
You can have a diffuse, normal, and emission map per texture.
Tips:
If you can help it, don't use emission maps due to the extra cost in performance.
Keep your texture resolutions low (512)
Use a high target strength for better looks.
Try blending textures using the blend mode action (B) to get new looks.
Use experimentation.
Use Ctrl Z to undo.

